Performance Evaluation of Macor Dental Ceramic: An Investigation with Rotary Ultrasonic Machining
Ravi Pratap Singh1*, Ravinder Kataria2, Sandeep Singhal3
1Department of Industrial & Production Engineering, Dr. B R Ambedkar National Institute of Technology, India
2Department of Mechanical Engineering, Lovely Professional University, India
3Department of Mechanical Engineering, National Institute of Technology, India
Submission: November 06, 2017 ; Published: April 04, 2018
*Corresponding author: Ravi Pratap Singh, Department of Industrial & Production Engineering, Dr. B R Ambedkar National Institute of Technology, Jalandhar, Punjab, India, Email: ravipratap.1512@gmail.com
How to cite this article: Ravi P S, Ravinder K, Sandeep S. Performance Evaluation of Macor Dental Ceramic: An Investigation with Rotary Ultrasonic Machining. Adv Dent & Oral Health. 2018; 8(2): 555733. DOI: 10.19080/ADOH.2018.08.555733
Abstract
Macor dental ceramic has been glowingly observed as a classic ceramic material which holds enlarged applications in the field of numerous manufacturing and medical industries especially in dentistry field, because of its excellent and versatile properties. However, its fruitful and productive processing is quite difficult through conventional methods. This article attempts to experimentally investigate the performance (in terms of surface roughness) of macor dental ceramic with rotary ultrasonic machining. The surface roughness has been investigated under the influence of different input factors, namely spindle speed, feed rate, coolant pressure, and ultrasonic power. The experiments have been conducted through response surface methodology. Microstructure analysis of the machined samples has revealed and confirmed the presence of dominating brittle fracture that caused removal of material along with the slighter plastic deformation of the work surface. The best surface quality has been attained as 0.5130 μm (at experimental run 17) which is corresponding to the lower feed rate and moderate level of other parameters.
Keywords: Ceramic; Dentistry; Machining; Macor; Microstructure; Roughness; RUM
Introduction
Macor dental ceramic is well known as one of the highly demanding material in the family of technically advanced medical ceramics, which acquires an unrivalled combination of superior thermal, mechanical, electrical and chemical properties i.e.; better hardness, chemically durability, excellent wear resistance, high temperature stability, etc. Because of the above stated versatile properties of macor dental ceramic, it covers a broad range of application in several industries such as; medical and laboratory equipments, aerospace, electronics, automobile, etc [1-3]. More distinctively, macor ceramic is used in welding nozzles, dentistry, space shuttle parts, etc. Regardless of exceptional capabilities, it’s processing with various processing methods does not provide productive solutions and casually results with several drawbacks such as; high processing cost, surface defects, lesser material removal rate, micro cracks, and lesser accuracy, which further entangled its expansion to market [4,5]. Hence, there is a favorable requirement to develop a cost-effective and highly accurate machining solution which can process this highly demanding dental ceramic in an effective way.
Among the available contemporary machining methods introduced for processing typical and advanced materials (i.e. ceramics, composites, etc.), Rotary Ultrasonic Machining (RUM) method has been observed as one of the best suitable candidates which fits for precise processing of macor dental ceramic material as this process produces thermal damage free profiles along with better surface quality [6-13].
RUM is a hybrid non-traditional machining solution that merges the mechanisms of conventional grinding and static USM, reporting with enhancive Material Removal Rate (MRR) and better surface quality than that attained by either static USM or diamond grinding, utilized potentially to machine a wide range of latest and difficult-to-machine materials including ductile, hard and brittle, ceramics, and composites, etc [14-22]
It is revealed from the literature review that, there has been only a few research studies reported on RUM of macor dental ceramic material. In the light of the above discussion, current article has been focused to experimentally investigate the surface roughness under the influence of several process factors in RUM of macor dental ceramic by using response surface methodology. The microstructure of the machined work samples have been analyzed to understand the different mechanisms of material removal from the work surface using Scanning Electron Microscope (SEM).
Materials and Methods
The macor dental ceramic’s peerless microstructure makes it distinct from most variant ceramics and glasses [2,3]. The fabrication process of macor dental ceramic starts with the mixing of raw materials in a ball-mill having alumina balls followed by melting at 1550°C for 2 hours in a crucible. The molten metal is further casted on a steel mould of desired shape (rectangular). The adequate nucleation was attained by heat treating the prepared samples at 680°C for 2 hours. During this process, the re-crystallization of chondrolite phase to smaller platy crystals of norbergite is also taken place. This further creates an extremely interconnected array of two-dimensional mica crystals diffused in a brittle glassy matrix.
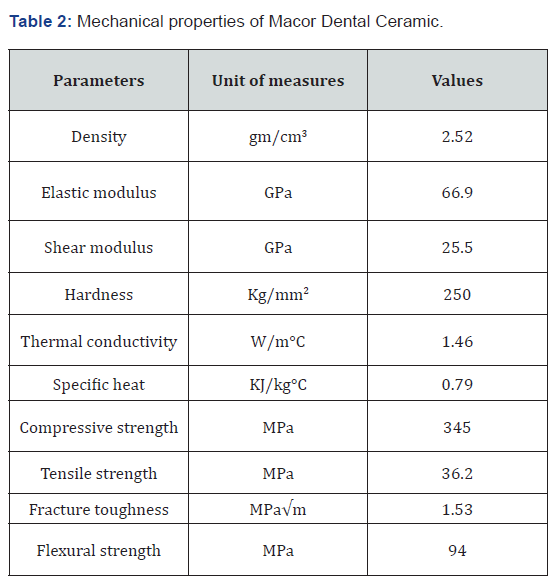
The microstructure of the machined surface was observed using SEM analysis (SEM EVO40, Carl Zeiss AG, Oberkochen, Germany). The present investigation involves the rotary ultrasonic drilling of macor dental ceramic under the influence of a distinctive set of experimental conditions. Table 1 & 2 are demonstrating the elemental composition and work material properties respectively.

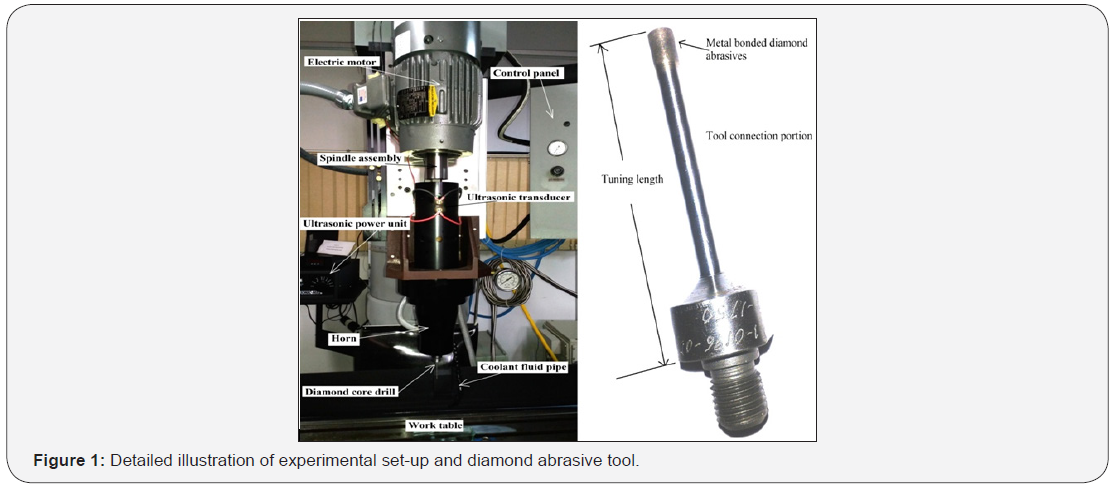
To investigate surface roughness in RUM of macor dental ceramic material, feed rate, spindle speed, ultrasonic power, and coolant pressure were selected as four process variables, as represented in Table 3. In the present experimental study, macor dental ceramic has been selected as a work material with the dimensions of 50×50×4mm. The experimentation work was performed on “Series10 Knee-mill” rotary ultrasonic machine setup (Sonic Mill, Albuquerque, NM, USA) having power capacity of 1kW. Figure 1 illustrates the major constituents of RUM set-up and diamond abrasive tool.

Experimentation and Data Collection
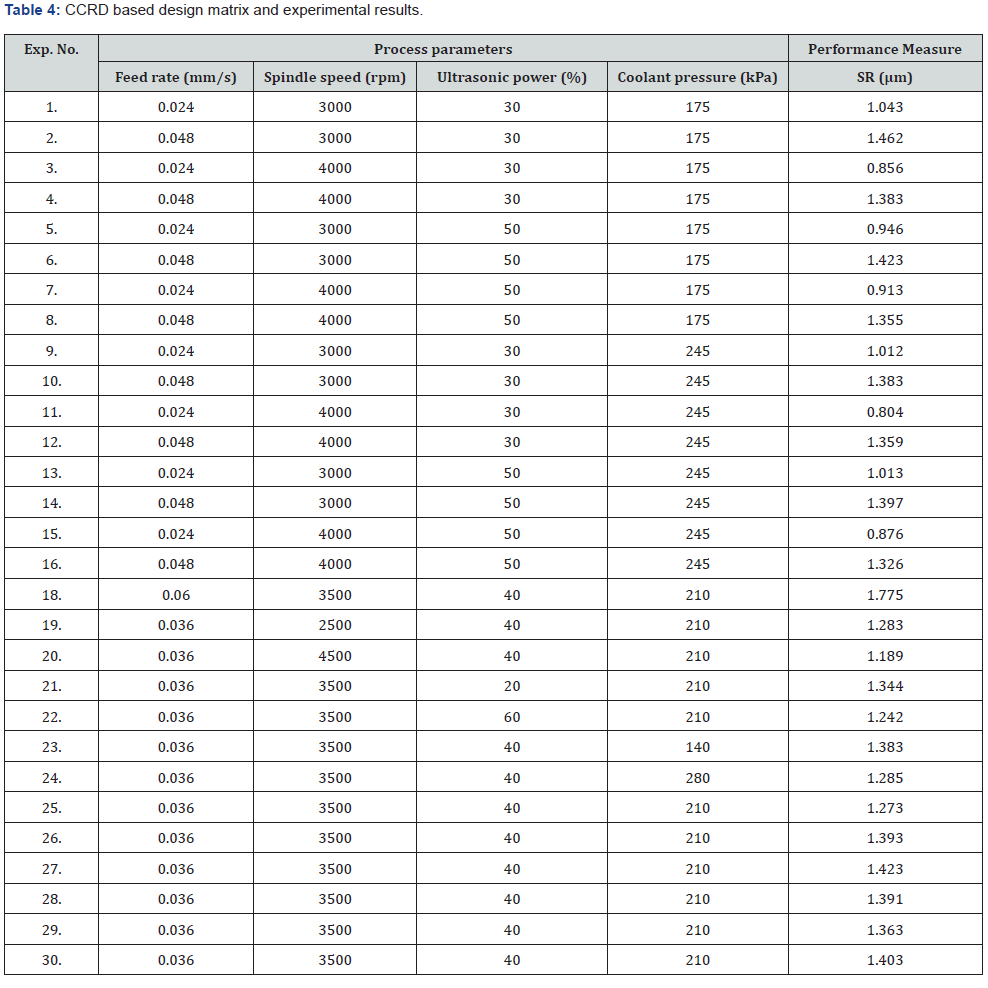
In the present study, the main experiments were planned and designed by using a design of experiments technique called as- “Response Surface Methodology (RSM)” through CCRD. For this purpose, statistical software known as- “Design Expert 9.0” (State- Ease, Inc., USA) was utilized. As per the designed experimental matrix, holes were drilled in macor dental ceramic workpiece under the different operating conditions. Table 4 is representing the complete experimental design plan along with the average values of SR. The SR of the drilled holes was measured with a surface tester (Carl Zeiss, MG, USA).
Results and Discussion
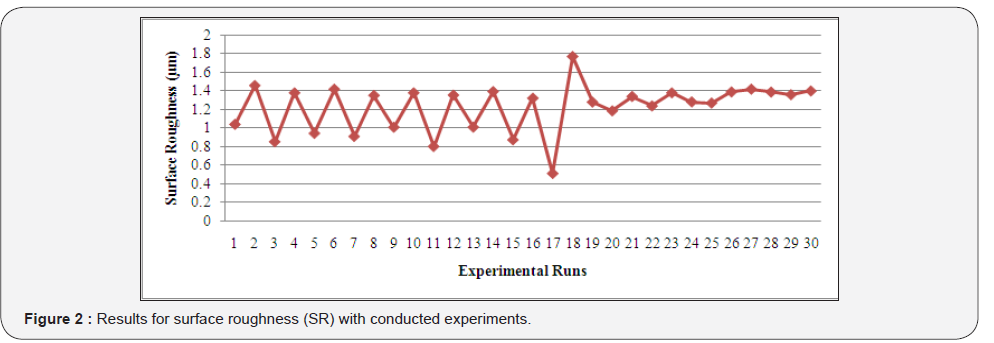
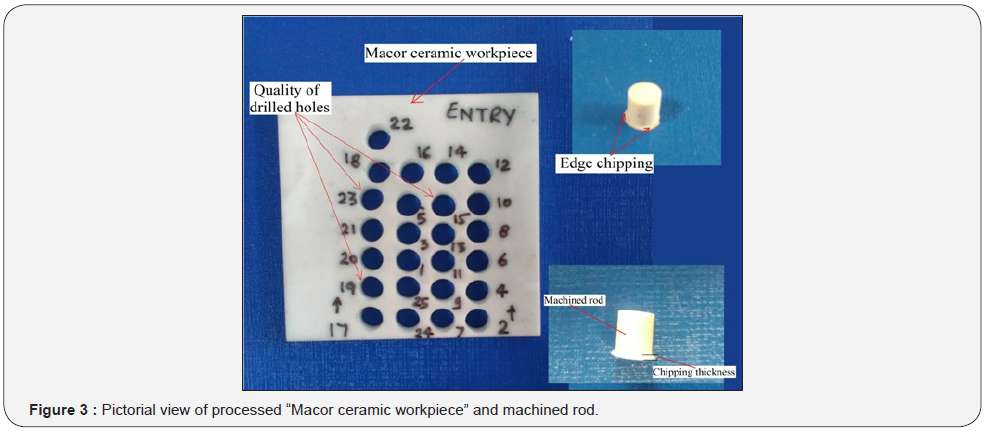
The experimental results for surface roughness have been further plotted over the line graphs to observe the variation of surface roughness values under different experimental runs. Figure 2 is depicting the surface roughness values against the several conducted experimental runs. It has been clearly observed from this plot that, the lowest value of surface roughness for macor dental ceramic has been attained against the experimental run number 17. This variation can be associated with the lower feed rate level under this experimental run (Figure 3).
Microstructure study of macor dental ceramic
In RUM, the characteristics of the surface under process are mainly getting influenced by the effect of feed rate, spindle speed, and ultrasonic power. Moreover, under few experimental conditions, apart from the brittle and plastic deformation of work material, the material removal can also take place as a combination of both the failure modes. Figure 4 represents the SEM set-up used for microstructure analysis.


Figure 5 shows the microstructure of machined surface corresponding to experiment no. 1. The parametric setting for this experimental run was having a combination of moderate level of feed rate and spindle speed. In RUM process, the diamond abrasive tool vibrating at ultrasonic frequency hammered the macor dental ceramic surface because of this the initiation and propagation of micro cracks takes place. Figure 6 depicts the SEM image consequent to experiment no. 11. The mixed mode of material removal has been found as the presence of brittle mode fracture confirmed with removal of bigger chunks from the surface.
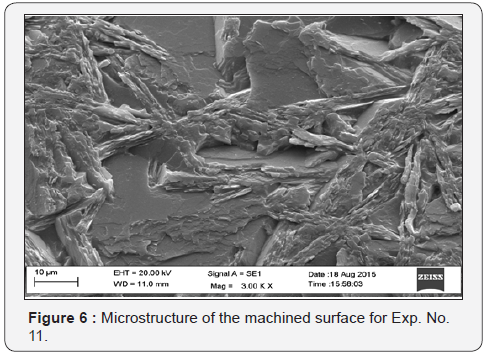
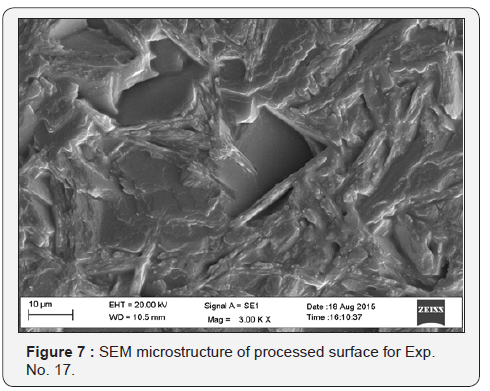
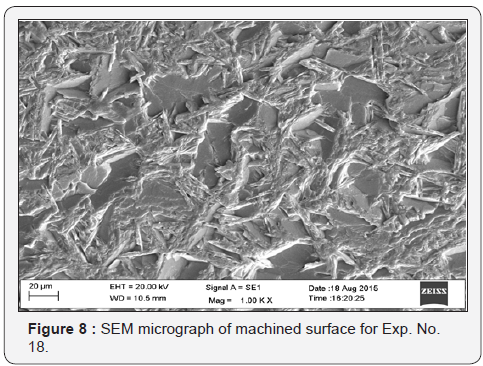
Figure 7 illustrates the microstructure of machined surface corresponding to experiment no. 17. SEM image reveals the presence of mixed mode of material removal along with the leading plastic mode failure of work material. It is also revealed that, at the lowest level of feed rate (0.012 mm/s), the indentation depth of abrasives decrements which further promotes the material to be removed in ductile mode. Figure 8 demonstrates the SEM microstructure corresponding to experiment no. 18. This surface microstructure reveals the presence of highly dominant brittle mode deformation of the work material. At a higher feed level (0.060 mm/s), the depth of penetration of abrasives into the work surface incremented considerably and hence resulted in the presence of profound abrasion marks which further causes material to be removed. Sharper and pointed edges have been clearly observed on the machined surface.
Conclusion
The following conclusions can be made from the present investigation:
a) The feed rate factor has been revealed as the most influential for SR, in RUM of macor dental ceramic. Lower feed rate gives the best solution with respect to SR. This can be concerned to the decrement in the indentation depth of abrasives occurs at the diminished feed rate level. An incremented spindle speed level also promotes the chances of material removal in a ductile mode, which further produces the finer surfaces.
b) In RUM of macor dental ceramic, crack propagation often observed since the work surface under processing is getting stressed cyclically. As the penetration depth of abrasives increases (at higher feed rate), the proportion of the brittle mode deformation has been revealed to be increased.
c) Experimental setting at run number 17 provides the better results in terms of surface roughness as the value of roughness has been observed as lowest i.e. 0.5130μm at this experiment run. A parametric combination possessing feed rate at a lower level and spindle speed at a higher level, offers more favorable conditions for the plastic mode deformation to occur in RUM of macor dental ceramic as for this setting the indentation depth of diamond abrasives reduces considerably.
References
- Churi NJ, Pei ZJ, Shorter DC, Treadwell C (2009) Rotary ultrasonic machining of dental ceramics. International Journal of Machining and Machinability of Materials 6(3-4): 270-284.
- Singh RP, Singhal S (2016) Investigation of Machining Characteristics in Rotary Ultrasonic Machining of Alumina Ceramic. Materials and Manufacturing Processes 32(3): 309-326.
- Grossman DG (1978) Machining a machinable glass-ceramic. Vacuum 28(2): 55-61.
- Kataria R, Kumar J, Pabla BS (2015) Experimental investigation into the hole quality in ultrasonic machining of WC-Co composite. Materials and Manufacturing Processes 30(7): 921-933.
- Kataria R, Kumar J, Pabla BS (2016) Experimental investigation and optimization of machining characteristics in ultrasonic machining of WC-Co composite using GRA method. Materials and Manufacturing Processes 31(5): 685-693.
- Singh RP, Singhal S (2016) Rotary ultrasonic machining of macor ceramic: an experimental investigation and microstructure analysis. Materials and Manufacturing Processes 32(9): 927-939.
- Li ZC, Cai LW, Pei ZJ, Treadwell C (2006) Edge-chipping reduction in rotary ultrasonic machining of ceramics: finite element analysis and experimental verification. International Journal of Machine Tools and Manufacture 46(12): 1469-1477.
- Singh RP, Singhal S (2016) Experimental investigation of machining characteristics in rotary ultrasonic machining of quartz ceramic. Journal of Materials: Design and Applications.
- Singh RP, Singhal S (2015) Rotary ultrasonic machining of advanced materials: a review. International Journal for Technological Research in Engineering 2(7): 777-785.
- Singh RP, Singhal S (2016) Experimental study on rotary ultrasonic machining of alumina ceramic: microstructure analysis and multiresponse optimization. Journal of Materials: Design and Applications.
- Singh RP, Singhal S (2016) Rotary ultrasonic machining: a review. Materials and Manufacturing Processes 31(14): 1795-1824.
- Xu S, Shimada K, Mizutani M, Kuriyagawa T (2014) Fabrication of hybrid micro/nano-textured surfaces using rotary ultrasonic machining with one-point diamond tool. International Journal of Machine Tools and Manufacture 86: 12-17.
- Singh RP, Singhal S (2016) An experimental study on rotary ultrasonic machining of macor ceramic. Journal of Engineering Manufacture.
- Zhang C, Cong W, Feng P, Pei Z (2014) Rotary ultrasonic machining of optical K9 glass using compressed air as coolant: A feasibility study. Proceedings of the Institution of Mechanical Engineers, Part B: Journal of Engineering Manufacture 228(4): 504-514.
- Liu JW, Baek DK, Ko TJ (2014) Chipping minimization in drilling ceramic materials with rotary ultrasonic machining. International Journal of Advanced Manufacturing Technology 72(9-12): 1527-1535.
- Cong WL, Pei ZJ, Treadwell C (2014) Preliminary study on rotary ultrasonic machining of CFRP/Ti stacks. Ultrasonics 54(6): 1594-1602.
- Zhang CL, Feng P, Zheng S, Wu ZJ, Yu DW (2011) Experimental investigation of rotary ultrasonic face milling of K9 glass. Advanced Materials Research 230-232: 644-648.
- Zhang CL, Feng PF, Pei ZJ, Cong WL (2014) Rotary ultrasonic machining of sapphire: feasibility study and designed experiments. Key Engineering Materials 589: 523-528.
- Geng D, Zhang D, Xu Y, He F, Liu F (2014) Comparison of drill wear mechanism between rotary ultrasonic elliptical machining and conventional drilling of CFRP. Journal of Reinforced Plastics and Composites 33(9): 797-809.
- Abdo B, Darwish SM, El-Tamimi AM (2012) Parameters optimization of rotary ultrasonic machining of zirconia ceramic for surface roughness using statistical taguchi’s experimental design. Applied Mechanics and Materials 184: 11-17.
- Kataria R, Singh RP, Kumar J (2016) An experimental study on ultrasonic machining of tungsten carbide cobalt composite materials. AIMS Material Science 3(4): 1391-1409.
- Singh RP, Kumar J, Kataria R, Singhal S (2015) Investigation of the machinability of commercially pure titanium in ultrasonic machining using graph theory and matrix method. Journal of Engineering Research 3(4): 75-94.


