Abstract
Experimental measurement of thermal cycling and force evolution during friction stir welding (FSW) remains challenging owing to the simultaneous rotational and translational motion of the tool and the severe plastic deformation induced in the surrounding workpiece material. In this study, a lightweight, integrated in situ process monitoring kit was developed to measure temperature, axial force (F), torque, and twoway bending at the welding location in real time. Tilt-free FSW experiments were performed on AA6061 under various rotational speeds (w) and traverse speeds (v). The results showed that higher w and lower v effectively increased the generated frictional heat, thereby reducing the material flow stress and resulting in lower F, torque, and bending moments. The welded joint fabricated at 1200 rpm and 150 mm/min exhibited the best material intermixing, weld quality, and tensile strength owing to sufficient heat input. Additionally, a visualization approach based on two-way bending-moment mapping was introduced to support intuitive weld-quality assessment. These findings contribute to the advancement of digital visualization and intelligent control of FSW processes.
Keywords:Friction stir welding; Monitoring kit; Bending moment; Tensile properties
Abbreviations:FFT: Fast Fourier Transform; SZ: Stir Zones; YS: Yield Strength; UTS: Ultimate Tensile Strength; EL: Elongation; FSW: Friction Stir Welding
Introduction
Friction stir welding (FSW) is a solid-state joining process known for its energy efficiency and environmental friendliness [1,2]. Owing to its clear advantages over conventional welding methods, FSW has been widely adopted in the automotive, aerospace, and marine industries [3]. With the growing demand for high-performance manufacturing and welding in both industrial and engineering fields, intelligent FSW has emerged as a new research direction in which data acquisition plays a crucial role. Developing robust monitoring methods to assess welding conditions is essential for maintaining high production efficiency and ensuring weld quality.
Researchers have proposed various in-process sensing and monitoring approaches, including embedding sensors in the tool holder [4,5]. For example, process temperature is commonly measured by embedding thermocouples into the base material [6]. However, as the thermocouples are located at a distance from the actual contact interface, measurement accuracy is often compromised [7]. Force and torque have traditionally been measured using external two-component dynamometers [8], whereas internal weighing sensors measure strain based on resistance or charge. Additionally, piezoelectric rotary dynamometers and force sensors have also been embedded [9]. However, their high cost and complex installation limit their adoption in industrial applications [10,11]. For example, Ma et al. embedded PVDF sensors into the front end of a machining tool to measure force and placed the data-acquisition and wirelesstransmission modules in the tool holder [12]. Although effective, this configuration results in low sensitivity and increased system size owing to the complexity of the circuits. Consequently, developing lightweight, high-precision monitoring systems remains a major challenge.
From the perspective of signal-based monitoring, temperature, force, and torque have recently been widely used to detect defects and track tool movement during FSW [13]. Li et al. reported that welding temperature affects the microstructural characteristics, grain size, and mechanical properties of Ti6Al4V joints produced by FSW [14]. Additionally, force measurements have been directly correlated with weld quality. Shrivastava et al. observed that the applied force is proportional to the volume of sheared material driven by the tool [15]. Bhattacharya et al. demonstrated that torque provides an indirect evaluation of the shear stress at the tool–workpiece interface, which in turn determines heat generation and plastic flow [16]. However, relying solely on these variables is insufficient to fully characterize stress distribution and material flow during the welding process. In practice, the mixing head experiences lateral resistance from the front-end material during movement. This lateral force, known as bending, can significantly influence residual stress distribution and heat transfer, thereby affecting weld quality. Moreover, bending is a critical factor influencing the lifespan of the stirring pin.
To address these challenges, this study introduces a highly reliable and lightweight integrated device, referred to as an insitu process-monitoring kit, designed to simultaneously monitor multiple parameters in real time, including temperature (T), axial force (F), bending moments (Bx and By), and torque (M). This system enables comprehensive observation of the welding process and provides a basis for subsequent analysis. During the FSW process, various welding parameters, such as rotational speed and traverse speed, were adjusted. Their effects on process parameters, microstructure, and tensile properties of the weld zone were analyzed while verifying the accuracy and effectiveness of the tool. Furthermore, a tilt-free FSW mode was employed to enhance process stability and control, reducing the need for precise adjustments to welding paths and angles. These findings provide valuable technical insights for establishing relationships between process parameters and the mechanical performance of FSW-produced specimens, ultimately aiding in the stable control of the FSW process.
In Situ Process Monitoring Kit
Basic introduction
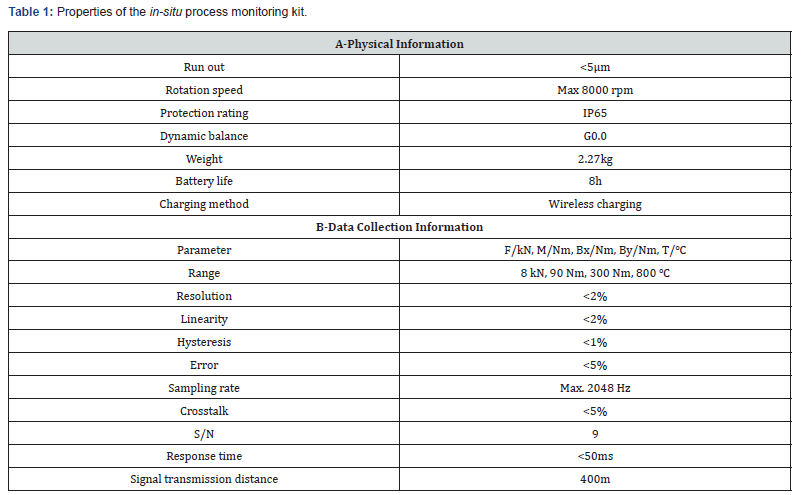
Tests were performed using the in-situ process monitoring kit (iKIT-BT40-SLA20-FSW, IDQ Science and Technology, Hengqin, Guangdong, Co, Ltd, China), which records T, F, Bx, By, and M. This monitoring kit enhances process transparency and serves as a key tool for improving process optimization, productivity, and weld-quality assurance. The core advantage of the iKIT intelligent wireless monitoring system lies in its ability to obtain measurements in close proximity to the tool–workpiece interface. By integrating sensors for force, torque, two-way bending moment, and temperature, combined with high-frequency data sampling, wireless transmission, and a self-powered unit, the kit enables real-time capture of true machining conditions. Compared with monitoring methods that rely on machine-side or external probes, this in situ sensing design provides more real-time and detailed data, offering a direct basis for tool life prediction, chatter identification, parameter optimization, and workpiece quality control. For industrial users seeking high yield and zero defects, this intelligent wireless testing system is not a simple refit-it drives a shift from experience-based decision-making to data-driven control and from post-process inspection to realtime monitoring. Detailed system performance specifications and integration instructions are provided in Table 1 and subsequent sections.
Data measurement
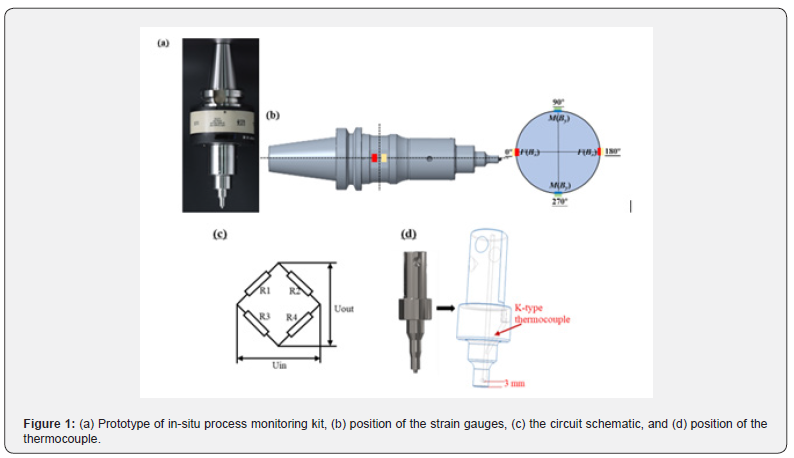
The prototype of the in-situ process monitoring kit is shown in Figure 1a. The system primarily integrates strain and temperature monitoring. Strain monitoring is achieved by affixing strain gauges to the thinnest curved surface of the shaft body to record deformation during force application. As shown in Figure 1b, strain gauges were attached at 0° and 180° to measure F and Bx, and at 90° and 270° to measure M and By. A strain gauge for measuring the bending moment was attached near the stirring tool. Preliminary simulations indicated that this location exhibited the highest sensitivity to bending. To compensate for potential interference and amplify the output signal, a full Wheatstone bridge was constructed using four strain gauges for each measured parameter Figure 1c, where R1-R4 represent the four strain gauges, Uin represents the input voltage, and Uout represents the output voltage. Temperature was measured using a K-type thermocouple embedded 3mm from the tool pin Figure 1d, ensuring protection from high-speed rotation and intense stirring.
The measurement ranges were 0-800℃ for T, 0-8 kN for F, 0-90Nm for M, and 0-300 Nm for Bx and By. The in-situ process monitoring kit exhibited high detection precision, with a resolution of 2%, linearity of 2%, hysteresis of 1%, and error of 5%. Notably, crosstalk effects between measurement channels remained below 5% Table 2. Data were transmitted to the host computer in real time at acquisition frequencies of 128 Hz for T and 1024 Hz for F, M, Bx, and By. Data transmission and power supply. To ensure efficient and durable use of the kit, as well as a stable power supply, a magnetic charging module was designed to attach to the tool-holder keyway Figure 2a. A wireless charging module is incorporated within the charger, ensuring its flexible use in industrial production. A wireless charging transmitter and receiver, each with a coil, are incorporated into the charger and shaft, respectively Table 3. The transmitter coil generates an electromagnetic signal, while the receiver coil generates current from this signal to power the in-situ process monitoring kit Figure 2b.
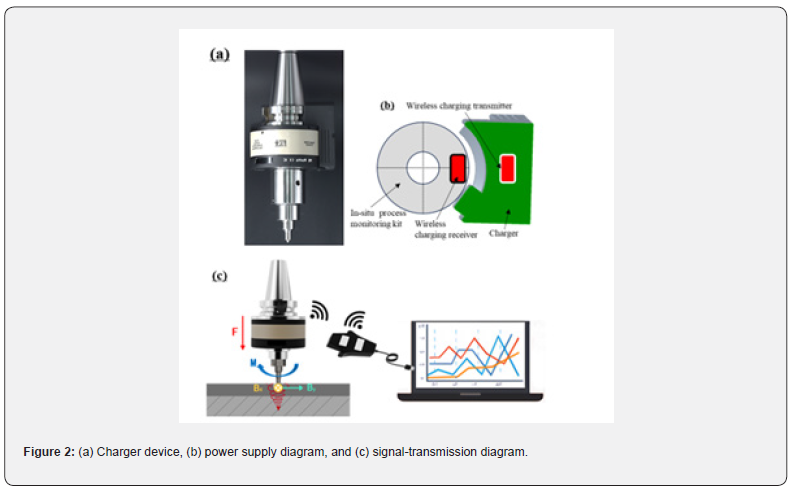
Wireless data communication for the monitoring kit is achieved via radio transmission using the ZigBee protocol. A USB receiver connects to either a PC or the machine-tool controller for data display and closed-loop adaptive control Figure 2c. Real-time signals are visualized through the self-developed “DTWireless” software (IDQ Science and Technology, China), which supports live monitoring, alarms, fast Fourier transform (FFT) analysis, signal filtering, and multiple visualization modes (for example, pointline and polar-plot displays). The processed data form the basis for subsequent analyses presented in Section 4.
Materials and Methods
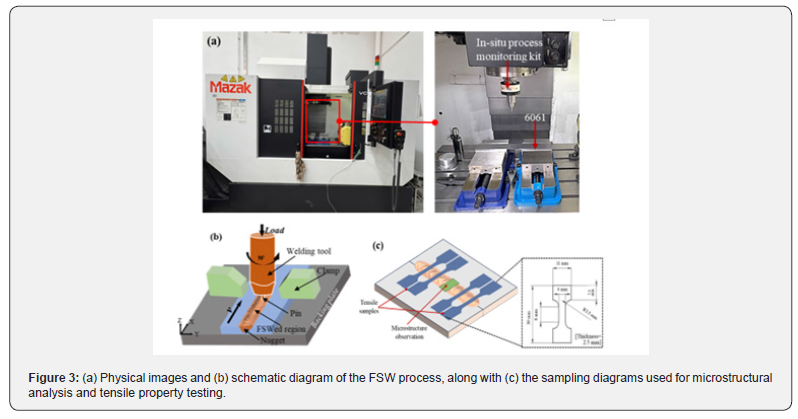
The AA6061 alloy (T6 state, composition: Si-057 wt%, Fe-0.58 wt%, Cu-0.24 wt%, Mn-0.10 wt%, Mg-1.11 wt%, Cr-0.14 wt%, Zn- 0.06 wt%, Ti-0.05 wt%, Al-Bal.) was used as the base material. The alloy plates were cut into uniform pieces measuring 400mm × 50mm × 4mm to produce the weld joint, as shown in Figure 3a. The FSW process was performed using a Mazak vertical machining center (Mazak VCE570L, YAMAZAKI Mazak Corporation, Japan), and a tool (W360 tool steel) with a 3mm pin diameter Figure 1d. All experiments were conducted using a tool tilt angle of 0°. The process parameters included a rotational speed (w) ranging from 800 to 1000rpm, traverse speed (v) between 150 and 200mm/ min, and fixed press depth (d) of 0.15mm. These parameters and their corresponding sample identifiers are summarized in Table 2. During the FSW process, the plates were securely clamped to prevent displacement Figure 3b. Following welding, the samples were cut using a wire electrical discharge machine (EDM, DK350, DaTie Machinery Co., Ltd., China), as illustrated in Figure 1c, for microstructural observation and tensile testing. The cross-sections of the samples were examined using optical microscopy (GX71, Olympus, Japan) after grinding, polishing, and etching with Keller’s reagent. Tensile samples were prepared in accordance with the ASTM E8/E8M-13a standards and tested using a universal tensile machine (WDW-20, Shanghai Bairoe Test Instrument Co., Ltd., China) at a strain rate of 2mm/min. To further analyze the fracture mechanisms, scanning electron microscopy (SEM, S-4300N, Hitachi, Japan) was used to examine the fracture surfaces obtained after tensile testing.
Results and Discussions
Analysis of the in situ monitored data
After the pin was inserted under the applied F, the highspeed rotating tool effectively softened the welding position and surrounding material by generating heat. As the tool traversed along the welding direction (X direction, Figure 3b), friction between the rotating–translating tool shoulder and pin and the workpiece material generated additional heat. The softened material was extruded from the advancing side of the tool to the retreating side, where it merged with the material displaced from the retreating side. During this process, the softened material exerted F, Bx and By and M on the stirring tool, enabling a comprehensive characterization of the thermal process and material plastic deformation behavior. The transverse bending moment (Bx, Figure 2c) represents the feed bending moment along the welding direction, as the stir tool advances through the material. The lateral bending moment (By, Figure 2c) is generated by the rotational motion of the stir tool during FSW. Mendes et al. demonstrated that the direction of By is defined from the retreating side of the weld toward the advancing side [17]. This is because the advancing side is hotter than the retreating side, requiring a greater force to deform the material on the retreating side Figure 3c.
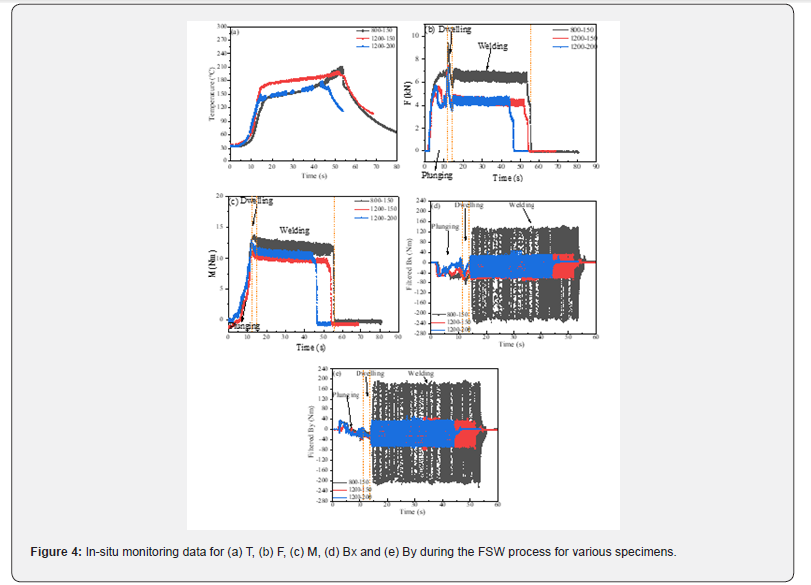
The evolution of the in situ monitored processing data, including T, F, M, Bx, and By during the FSW process, is summarized in Figure 4. We applied smoothing filtering FFT to the Bx and By data and set the adjustment factor to eight, which allowed the observation of the overall trend while preserving the waveform characters of the data. The results indicated that T Figure 4a increased sharply to its maximum value as the pin was immersed in the 6061 materials. Similarly, the evolution of F, in Figure 4b, exhibited a sudden increase as the pin penetrated the 6061 materials. This rapid increase in force occurred because the pin had to overcome the material’s resistance to deformation. As the penetration increased, the contact area between the pin and material expanded, causing the F to continuously increase until it reached a peak. Previous studies have shown that this peak force, generated during penetration, can make the pin susceptible to buckling failure. Therefore, monitoring this peak value helps prevent tool failure. Users can set alarm thresholds in the software developed in this study to stop welding as F approaches critical values, thus minimizing tool damage and improving production efficiency. The gradual decrease in force occurred because the tool remained in a fixed position (2s), during which the material reached a sufficiently high temperature. As the local softening around the pin increased, the F clearly decreased and then gradually stabilized during the welding process when the weld was uniform. M Figure 4c followed a similar pattern to F, increasing during penetration, reaching its maximum value, then decreasing during the dwell stage, and finally stabilizing. Torque represents the resistance of the material to the high-speed rotating tool, and its magnitude is governed by the fluidity of the material during the FSW process. M tends to increase as the tool plunges into the plate and reaches the required plunge depth [18]. The absolute values of the two-way bending moments, Bx and By, also gradually increased during the plunging process and reached their first peaks Figure 4d & 4e, resulting from the lateral resistance of the unsoftened material. Once the FSW tool began to move along the X-direction Figure 3, all processing signals detected by the in-situ process monitoring kit gradually stabilized, reaching steadystate values for the remainder of the welding stage. At the end of welding, as the tool was lifted, all processing signals exhibited a sharp decline Figure 4.
Effect of processing parameters
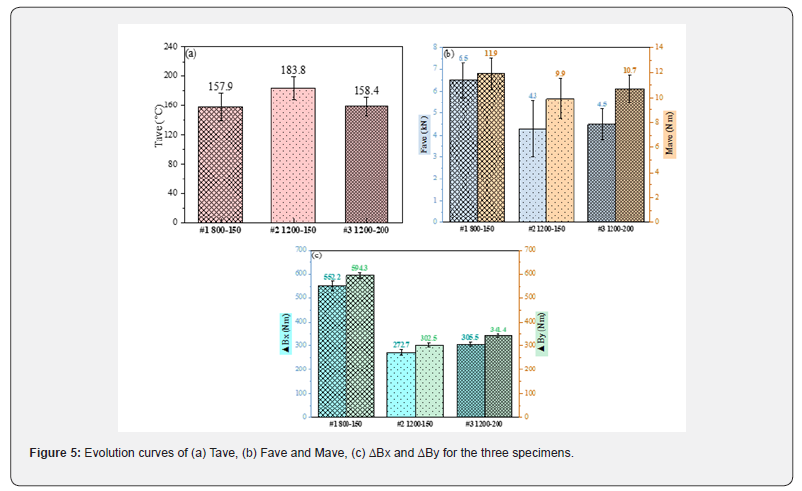
The evolution of these signals varied owing to the different combinations of welding parameters in each test. To facilitate subsequent analysis, several characteristic values were extracted from the in situ FSW data to evaluate the effects of welding parameters on the monitored responses. Here, Tave, Fave, and Mave represent the average value of T, F, and M during the steady-state welding stage, respectively, while ΔBx, ΔBy denote the amplitudes of Bx and By, respectively the calculated results are summarized in Figure 5a. The results show that peak T increases with rotational speed (w) and decreases with traverse speed (v). When w increased from 800 to 1200rpm, Tave increased from 157.9 ± 18.9℃ to 183.8 ± 15.2℃. Conversely, when v increased from 150mm/ min to 200mm/min, Tave decreased to 158.4±13.2℃. This trend is closely related to the frictional heat generated per unit area, which increases at higher w and lower v. Furthermore, w exerted a significant effect on heat generation than v, during welding, which is consistent with the findings of [19].
As w increases, the heat-generation capacity of the tool also increases, promoting a rise in deformation temperature and enhancing thermal vibration of metal atoms. This environment facilitates plastic deformation by reducing slip resistance and enhancing atomic diffusion and viscous intergranular flow, thereby decreasing material resistance. Consequently, both Fave and Mave decrease. [20] similarly reported that increasing rotational speed strongly affects F and spindle torque by elevating heat input and accelerating material flow. With higher w, the material softens more readily, its shear strength decreases, and tool stirring efficiency improves, resulting in a reduction in Fave and Mave [21]. Fave and Mave decreased from 6.5±0.8 kN and 11.9±1.3Nm to 4.3±0.7kN and 9.9±1.6 Nm, respectively Figure 5b. The corresponding enhancement in material fluidity also reduced the two-way bending moment values. As the rotation speed increased, the heat generation efficiency of the stirring head improved, which enhanced material softening and reduced the resistance acting on the stirring pin (reflected by a decrease in ΔBy). The improved plasticity of the surrounding material also diminished the tangential resistance experienced by the tool, resulting in a further reduction in the bending-moment amplitude ΔBx. Consequently, ΔBx and ΔBy decreased from 552.2±18.5Nm and 594.3 ±11.7Nm to 272.7±12.2kN and 302.5±8.2Nm, respectively [21].
By contrast, the effect of traverse speed was more moderate. Increasing v to 200mm/min produced a negligible change in Fave (4.5±0.7kN), but Mave increased to 10.7±1.1Nm. Higher welding speeds lead to lower temperatures Figure 5a and higher strain rates, which increase the flow stress required for plastic deformation during FSW. This makes the force behavior during welding more complex and directly leads to the increase in Mave. This trend is consistent with findings of [22], who reported that a lower traverse speed decreases the frictional heat generation, which in turn enhances the flow stress of the material and consequently increases the torque. When w was set at 1200rpm, the corresponding ΔBx and ΔBy values were increased to 305.5±8.7Nm and 341.4± 6.7Nm, respectively, as v increased from 150mm/min to 200mm/min Figure 5c. This occurred because an increase in traverse speed reduces the heat input per unit length, making material mixing more difficult and requiring more energy for welding. However, the insufficient heat input under this condition increases resistance in the feed direction, thereby increasing the amplitudes of the two-way bending moments (ΔBx and ΔBy).
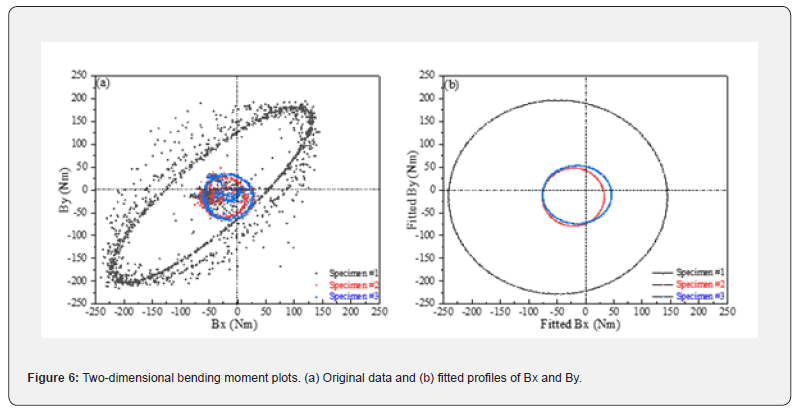
Furthermore, Bx and By were set as the horizontal and vertical coordinates, respectively Figure 6, in a coordinate system to visualize the transverse and lateral forces exerted on the stirring pin during welding. As shown in Figure 6b, the symmetry of the two-dimensional bending moments varied significantly across different process parameters. This difference was primarily caused by the asymmetric temperature distribution during welding. Previous studies have shown that as the stirring pin advances, the temperature on the advancing side of the weld becomes slightly higher than that on the retreating side. This is because, when the pin advances, the relative velocity and shear rate of the material at the contact interface between the pin and workpiece on the advancing side are higher than those on the retreating side, resulting in greater heat generation on the advancing side. This creates an asymmetric temperature field distribution, explaining why ΔBy is slightly higher than ΔBx, as shown in Figure 5c. Additionally, prior studies have investigated the material flow rate distribution around the stirring pin under angled FSW conditions and reported that the material in the shear layer outside the pin does not move at a steady deformation rate, but exhibits minor fluctuations within a small range. This results in asymmetric plastic deformation zones on both sides of the pin. Although those studies were conducted under tilted tool conditions, the findings are still valuable for analyzing the tilt-free FSW process in this study. As shown in the original data and the fitted image in Figure 6b, when w increased to 1200rpm and v decreased to 150mm/min (specimen #2), the plot approached a near-perfect circle. This indicates that under these processing parameters, the fluidity of the softened material and the corresponding degree of plastic deformation became more uniform, implying optimal flow behavior and weld quality under these conditions. Subsequent microstructural and mechanical analyses in this study further support this conclusion.
Microstructure observation
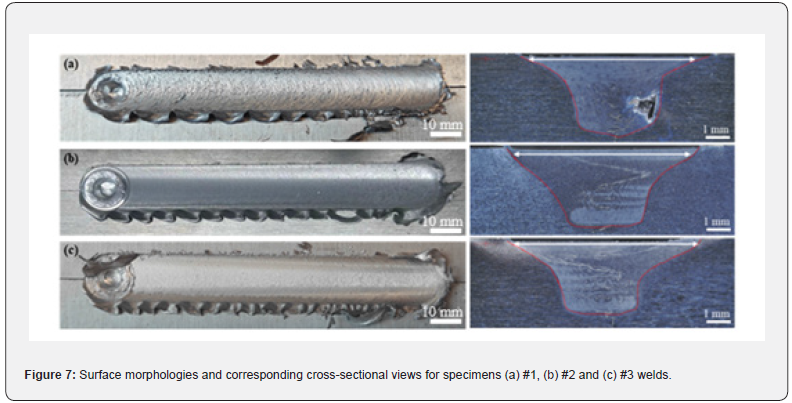
Figure 7 shows the weld surface and cross-sectional morphologies obtained under different welding parameters, with all stir zones (SZ) exhibiting a pan-shaped structure. For specimen #1, which had the lowest w, noticeable defects such as pores and kissing bonds were observed, consistent with the poor surface morphology shown in Figure 7a. Meanwhile, the weld surface became smoother as w increased from 800 to 1200rpm at a fixed v of 150mm/min, and the length of the SZ increased owing to higher frictional heat generation (Figure 7b, specimen#2). A higher rotation speed effectively increases the frictional heat at the interface, enhances heat input, and promotes sufficient material flow, thereby improving the forming quality. However, as v increased to 200mm/min Figure 7c, the weld formation of specimen #3 exhibited poor surface quality with slight welding defects, owing to the lower input provided under these parameters Figure 5. Additionally, a distinct burr was observed along the weld track of specimen #3, and the flash produced was uneven and irregular. This indicates unstable material flow caused by the high traverse speed, as confirmed by the monitoring data Figure 4 & 5, further verifying the relative instability of the welding process. Under these conditions, the material failed to adequately fill the cavity formed by the pin. This defect occurred owing to insufficient heat generation and inadequate material mixing caused by excessive traverse speed and shorter welding time. In such cases, the interface exhibited a clear separation line, indicating weak joint strength or lack of bonding, which severely compromised structural integrity. Specimen #2, processed at a higher w (1200rpm) and lower v (150mm/min), exhibited a defect-free welding zone and the best forming quality Figure 7b. This improvement was attributed to sufficient plasticization under higher heat input, resulting in a sound non-defective weld seam [23]. Based on the analysis of the monitoring data (Tave, Fave, Mave, ΔBx, and ΔBy), it can be deduced that the sufficient thermal evolution and lower shear strength during the FSW process led to the improved weld formation of specimen #2. These findings are consistent with those of [24], who demonstrated that increasing rotational speed promotes complete plasticization and homogeneous intermixed flow in AA6061 FSW joints.
Tensile properties
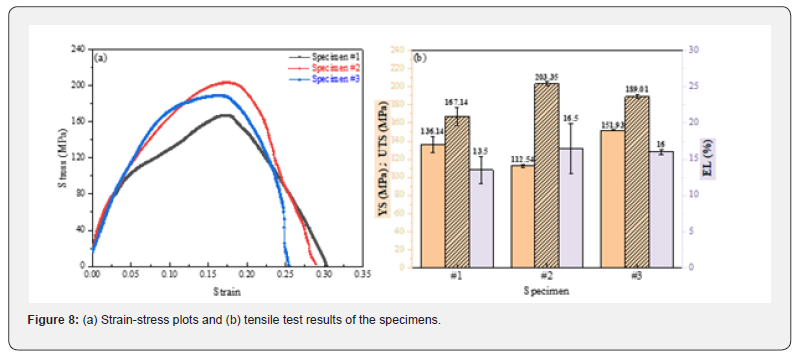
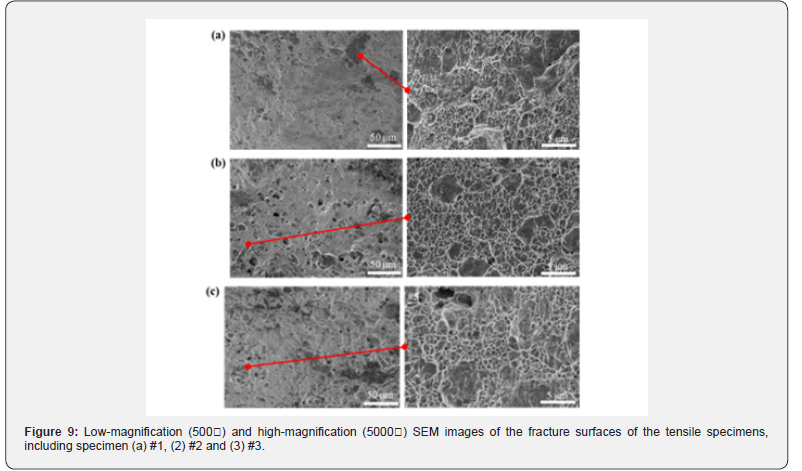
The stress-strain curves of the specimens and their corresponding tensile properties, including yield strength (YS), ultimate tensile strength (UTS), and elongation (EL), are shown in Figure 8a. It is evident that the tensile results for all specimens are lower than those of the base AA6061-T6 alloy (YS: 241MPa, UTS: 262MPa). This reduction is attributed to the thermal cycle during the FSW process, which significantly coarsens the grain structure and consequently decreases tensile performance [25]. The results indicate that the tensile performance of the FSW joints decreased with increasing v and improved with increasing w Figure 8b. The worst tensile properties were obtained at w = 800rpm and v = 150mm/min (specimen #1) with the values of 136.14±9.06MPa YS, 167.14±10.14MPa UTS, and 13.5±1.80% EL. Conversely, the best tensile performance was observed at w = 1200 rpm and v = 150 mm/min (specimen #2), showing 112.54±1.47 MPa YS, 203.35±2.25 MPa UTS, and 16.50±3.43% EL. For comparison, specimen #3 exhibited 151.93±0.42 MPa YS, 189.01±2.27MPa UTS, and 16.00±0.38% EL. Figure 9a presents the SEM images of the fracture surfaces of the tensile-tested specimens. Consistent with the tensile test results, as w increased and v decreased, the number of dimples on the fracture surfaces increased significantly, while the number and size of the pits decreased. For specimen #2 Figure 9b, numerous fine dimples were evident, indicating higher plasticity of the specimen, which corresponded to its higher EL (16.50±3.43) [26]. Conversely, specimens welded at lower w and higher v, particularly specimen #1, showed large pits and distinct cleavage features, suggesting a mixed ductile–brittle fracture mode Figure 9c. The coexistence of dimples (indicative of ductile fracture) and cleavage surfaces (indicative of brittle fractures) in specimen #3 further confirmed its lower tensile performance [27].


The mechanical properties of the welded zone were strongly influenced by the heat input (H), which could be estimated as H=w2/v. The calculated H values for specimens #1, #2, and #3 were 4266.7, 9600, and 7200, respectively. The superior tensile properties of specimen #2 resulted from its highest H value, which aligns with the monitored temperature profiles Figure 4,5, promoting improved material mixing and adequate bonding in the weld zone [28]. Conversely, a lower H resulted in insufficient material mixing, leading to defects in the weld cross-section Figure 7 and inferior tensile properties Figure 8,9. Adequate thermal cycling and the accumulation and interaction of dislocations in specimen #2 enhanced its strain-hardening capacity, leading to intensified dynamic recrystallization and dislocation accumulation, which further improved tensile performance [29]. Furthermore, the synergy between sufficient heat input and good material flow established optimal thermomechanical conditions. The process parameters corresponding to specimen #2 facilitated metallurgical bonding and maintained sufficient material plasticity for mechanical interlocking, resulting in a defect-free interface and superior tensile strength.
Conclusion
In this study, a lightweight, integrated in situ processmonitoring kit was developed to measure temperature, force, torque, and two-way bending moment at the welding position in real time. Based on tilt-free FSW tests conducted on AA6061 under various rotational and traverse speeds, the results indicated that increasing w and decreasing v generated greater heat input, resulting in reduced material flow stress and lower F, M, Bx and By. This study also introduced an intuitive and effective method for assessing weld quality. Smaller ΔBx and ΔBy values and a nearly circular Bx-By distribution indicated uniform plastic deformation around the tool, correlating with improved weld formation and mechanical performance. The processing condition of 1200rpm and 150mm/min produced sufficient heat input, enhanced material intermixing and plasticization, and resulted in superior tensile properties (184.8MPa YS, 218.3MPa UTS, and 23.4% EL). Overall, the proposed in situ monitoring strategy and bending-moment visualization approach provide effective tools for assessing weld quality and offer valuable insights for achieving stable, high-quality tilt-free FSW. The findings support the advancement of intelligent monitoring and control systems for FSW processes.
Declaration of Competing Interest
The authors declare that they have no competing financial interests or personal relationships that may have influenced the work reported in this paper.
Data Availability
Data supporting the findings of this study are available from the corresponding author upon request.
Acknowledgements
The authors sincerely acknowledge the financial support received from the Science and Technology Development Fund (FDCT) of Macau SAR (0110/2023/AMJ), and the National Key Research and Development Program of China (2023YFE0205300).
References
- Kumar PV, Reddy GM, Rao KS (2015) Microstructure and pitting corrosion of armor grade AA7075 aluminum alloy friction stir weld nugget zone-Effect of post weld heat treatment and addition of boron carbide. Def Technol 11(2): 166-173.
- Venugopal T, Rao KS, Rao KP (2024) Studies on friction stir welded AA 7075 aluminum alloy. Trans Indian Inst Met 57(6): 659-663.
- Rao CV, Reddy GM, Rao KS (2004) Microstructure and pitting corrosion resistance of AA2219 Al-Cu alloy friction stir welds–effect of tool profile. Def Technol 11(2): 23-131.
- Zhou C, Guo K, Sun J (2021) An integrated wireless vibration sensing tool holder for milling tool condition monitoring with singularity analysis. Measurement 174: 109038.
- Chen YL, Chen F, Li Z, Zhang Y, Ju B, et al. (2021) Three-axial cutting force measurement in micro/nano-cutting by utilizing a fast tool servo with a smart tool holder. CIRP Ann Manuf Technol 70 (1): 33-36.
- Cole EG, Fehrenbacher A, Duffie NA, Zinn MR, Pfefferkorn FE, et al. (2014) Weld temperature effects during friction stir welding of dissimilar aluminum alloys 6061-t6 and 7075-t6. Int J Adv Manuf Technol 71(1): 643-652
- Zhu QB, Chen SJ, Qi SS, Zhu WQ (2014) Internal temperature detection technology for high-speed rotating welding parts. Elect Weld Machine 44(2): 52-55.
- Gibson BT (2011) Custom low-cost force measurement methods in friction stir welding (Doctoral dissertation).
- Mehta M, Chatterjee K, De A (2013) Monitoring torque and traverse force in friction stir welding from input electrical signatures of driving motors. Sci Technol Weld Joi 18(3): 191-197.
- Totis G, Wirtz G, Sortino M, Veselovac D, Kuljanic E, et al. (2010) Development of a dynamometer for measuring individual cutting-edge forces in face milling. Mech Syst Signal Process 24(6): 1844-1857.
- Ma L, Melkote SN, Castle JB (2014) PVDF sensor-based monitoring of milling torque. Int J Adv Manuf Technol 70 (9-12): 1603-1614.
- Ma L, Melkote SN, Morehouse JB, Castle JB, Fonda JW, et al. (2012) Thin-film PVDF sensor-based monitoring of cutting forces in peripheral end milling. J Dyn Syst Measu Contr Trans ASME pp: 725-735.
- Lambiase F, Paoletti A, Ilio AD (2018) Forces and temperature variation during friction stir welding of aluminum alloy AA6082-T6. Int J Adv Manuf Technol 99: 337-346.
- Li J, Cao F, Shen Y (2020) Effect of welding parameters on friction stir welded Ti-6Al-4V joints: temperature, microstructure and mechanical properties. Metals 10(7): 940.
- Selvamani ST (2022) Various welding processes for joining aluminum alloy with steel: effect of process parameters and observations-a review. PI Mech Eng CJ Mec 236(10): 5428-5454.
- Bhattacharya TK, Das H, Jana SS, Pal TK (2016) Numerical and experimental investigation of thermal history, material flow and mechanical properties of friction stir welded aluminum alloy to DHP copper dissimilar joint. Int J Adv Manuf Technol 88(1-4): 847-861
- Mendes N, Neto P, Loureiro A, Moreira AP (2016) Machines and control systems for friction stir welding: a review. Mater Des 90: 256-265.
- Gumaste A, Tiu J, Schwendemann D, Singh A, Alvarado E, et al. (2024) Wires using multi-hole Solid Stir extrusion. Manuf Lett 40: 174-178.
- Memon S, Fydrych D, Fernandez AC, Dera kola HA (2021) Effects of FSW tool plunge depth on properties of an Al-Mg-Si alloy T-joint: Thermomechanical modeling and experimental evaluation. Materials 14(16): 4754.
- Acharya U, Roy BS, Saha SC (2019) Torque and force perspectives on particle size and its effect on mechanical property of friction stir welded AA6092/17.5 SiCp-T6 composite joints. J Manuf Process 38: 113-121.
- Talebizadehsardari P, Musharavati F, Khan A, Sebaey TA, Eyvaziana A, et al. (2021) Underwater friction stirs welding of Al-Mg alloy: Thermo-mechanical modeling and validation. Mater Today Commun 26: 101965.
- Shahi P, Barmouz M, Asadi P (2014) Force and torque in friction stir welding. Adv Frict Weld Process. Elsevier, pp. 459-498.
- Laska A, Szkodo M, Cavaliere P, Perrone A (2022) Influence of the Tool Rotational Speed on Physical and Chemical Properties of Dissimilar Friction-Stir-Welded AA5083/AA6060 Joints. Metals 12(10): 1658.
- Singh VP, Kumar A, Kumar R, Modi A, Kumar D, et al. (2024) Effect of rotational speed on mechanical, microstructure, and residual stress behaviour of AA6061-T6 alloy joints through Friction stir Welding. J Mater Eng Perform 33(8): 3706-3721.
- Liu FJ, Fu L, Chen HY (2018) Effect of high rotational speed on temperature distribution, microstructure evolution, and mechanical properties of friction stir welded 6061-T6 thin plate joints. Int J Adv Manuf Technol 96: 1823-1833.
- Dai P, Luo X, Yang Y, Kou Z, Huang B, et al. (2020) High temperature tensile properties, fracture behaviors and nanoscale precipitate variation of an Al-Zn-Mg-Cu alloy. Prog Nat Sci 30(1): 63-73.
- Fahimpour V, Sadrnezhaad SK, Karimzadeh F (2013) Microstructure and mechanical property change during FSW and GTAW of Al6061 alloy. Metall Mater Trans A 44: 2187-2195.
- Cavalierea P, Squillace A, Panella F (2008) Effect of welding parameters on mechanical and microstructural properties of AA6082 joints produced by friction stir welding. J Mater Process Technol 200(1-3): 364-372.
- Chowdhury SH, Chen DL, Bhole SD, Cao X, Wanjara P (2013) Friction stirs welded AZ31 magnesium alloy: microstructure, texture, and tensile properties. Metall Mater Trans A 44(1): 323-336.


